
| 일 | 월 | 화 | 수 | 목 | 금 | 토 |
|---|---|---|---|---|---|---|
| 1 | 2 | 3 | 4 | 5 | 6 | |
| 7 | 8 | 9 | 10 | 11 | 12 | 13 |
| 14 | 15 | 16 | 17 | 18 | 19 | 20 |
| 21 | 22 | 23 | 24 | 25 | 26 | 27 |
| 28 | 29 | 30 |
- 블록체인 기술
- Crash
- 프로그래머스
- solidity
- Algorithm
- dsYM
- 이더리움
- 재진입공격
- PBFT
- 백준
- 암호화폐
- Report
- pow
- POS
- Xcode
- 분산원장
- reentrancy
- 블록체인
- viewcontroller
- .dsym
- Blockchain
- 비트코인
- Mining
- view 이동
- ethereum
- ios
- DPOS
- DEFI
- 알고리즘
- External Call
- Today
- Total
개발하기좋은날
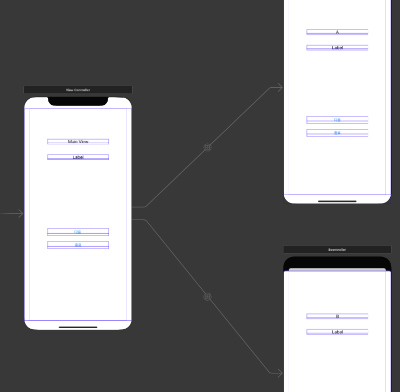
ViewController 사이 데이터 이동및 6가지 방법 본문
ViewController 사이 6가지 전송 방법이 있다
- property (A -> B)
- segue (A -> B)
- property와 함수 (A <- B)
- delegation
- closure
- NotificationCenter
하나씩 간단하게 알아보자
** 앞으로 대문자 A B C M 이 단독적으로 쓰이면 Controller를 의미하는거다 **
** xib파일로 ViewController 를 생성하거나, StroryBoard를 사용하여 ViewController를 생성할때 사용 방법이 조금 다르다 **
1. Property
- ViewController 안에 있는 변수들을 "프로퍼티" 라고 부른다
- 이를 이용한 방법이다
- 먼저 xib를 사용 했을때
- 예시1
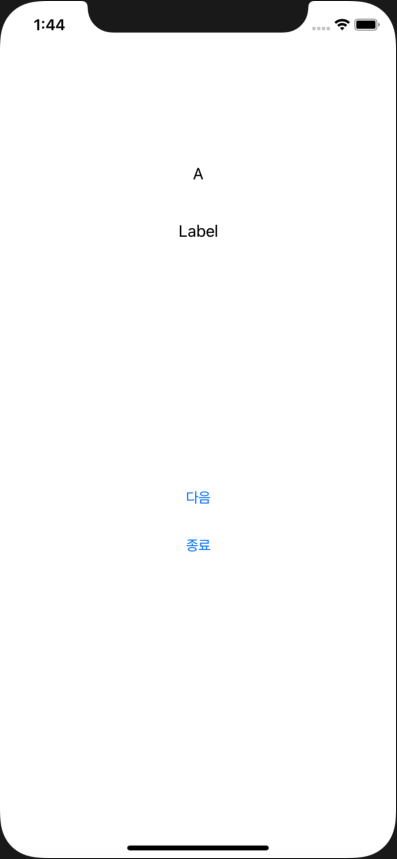
- M -> A(xib) 로 이동할떄
// M
class ViewController: UIViewController {

    @IBAction func nextButton(_ sender: Any) {
     	// 이동할 xib 컨트롤러 변수를 생성하고 해당 컨트롤러 프로퍼티 변수를 초기화 한다음 present로 호출
        let vc = xib_AController(nibName: "xib_AController", bundle: nil)
        vc.tmpInt = 1
        self.present(vc, animated: true, completion: nil)

    }
 }
- 결과
- 버튼을 클릭했을때 xib_AController로 이동히게 된다
- xib_AController 에서 tmpInt의 값을 출력하면 1로 바뀌어있다
- 새로운 인스턴스를 생성하는 개념이기떄문에 xib_AController 두번 호출했다고 이전 값이 1은 아니다
- 예시2
- M -> A 로 이동할때 (StroyBoard)
class ViewController: UIViewController {

    @IBAction func nextButton(_ sender: Any) {

        // 현재 속해있는 스토리보드를 얻은후에 withIdentifier가 "Acontroller"를 가지고온다
        let vc = self.storyboard?.instantiateViewController(withIdentifier: "Acontroller") as? Acontroller

        // 컨트롤러 불러오는 애니메이션 모드를 설정 아래값은 아래에서 위로
        vc?.modalTransitionStyle = .coverVertical

        // 컨트롤러 를 최대화면으로
        vc?.modalPresentationStyle = .fullScreen

        // 컨트롤러 프로퍼티에 hello world로 초기화
        vc?.tmp = "hello world"

        // 설정된 컨트롤러 호출
        self.present(vc!, animated: false, completion: nil)

    }
}
- 결과
- 버튼을 클릭했을때 A 로 이동하게 되고
- A 의 tmp string 프로퍼티가 hello world 초기화 되며
- A 에서 값을 확인해보면 정상적으로 초기화 되어있는것을 확인 할 수 있다
- 예시3
- MainStroyBoard M -> SecondBoard A 이동
- 다른 스토리보드에 있는 컨트롤러에 이동할때는 어떻게해야할까?
class ViewController: UIViewController {

    @IBAction func nextButton(_ sender: Any) {

        // 두번째 스토리보드 파일 이름을 불러온 다음
        let storyboard = UIStoryboard(name: "Secondboard", bundle: nil)

        // 두번째 스토리보드에서 만든 Acontroller를 호출
        let vc = storyboard.instantiateViewController(withIdentifier: "Acontroller") as! Acontroller

        vc?.tmp = "hello world"
        self.present(vc, animated: false, completion: nil)

    }
}
2.Segue
- StroyBoard 사용할때 사용할수있는 방법
- 먼저 Segue액션을 수행하기위한 Buttun Action 필요
- 아래 사진은 세그를 만드는 방법

- 예시1
- 세그를 이용하여 데이터를 넘겨주는 방법을 알아보자
- 그리고 세그가 여러개인경우는?
class ViewController: UIViewController {

	// segue 가 설정된 M 에서 prepare 함수를 오버라이딩 한다
    override func prepare(for segue: UIStoryboardSegue, sender: Any?) {

        // 세그 이벤트가 발생하면 해당 분기를 통해서 조건에 맞는 컨트롤러로 이동하게 된다
        if segue.destination is Acontroller {
            let vc = segue.destination as? Acontroller
            vc?.tmp = "hello world_A"
        }

        if segue.destination is Bcontroller {
            let vc = segue.destination as? Bcontroller
            vc?.tmp = "hello world_B"
        }

    }

}
3. property와 함수
- 많이 사용하지않는 방법이고 문제가 많은 방식 독립적이지않고 상호의존적이기(Coupled 하다) 떄문에 비즈니스 코드가 길어질수록 복잡해지므로 사용하지 않는다
- 하지만 알아보자, 방법은 간단하다
- B에서 A 컨트롤러에 대한 property를 만들고 A는 present시 또는 세그를 이용하여 이동시 본인의 context를 넘겨주는것이다
// A 컨트롤러
class ViewController: UIViewController {

    @IBAction func nextButton(_ sender: Any) {

        let vc = self.storyboard?.instantiateViewController(withIdentifier: "Acontroller") as? Acontroller

    	// 넘겨줄때 본인의 context를 넘겨준다
    	vc?.ViewController = self

        vc?.modalPresentationStyle = .fullScreen
        self.present(vc!, animated: true, completion: nil)

    }

    // B에서 A컨트롤러 함수를 호출한다
    func Reply(data:String){
        mainLabel.text = data
    }

}
- class 명이 Acontroller지만 주석을 믿어라
// B 컨트롤러
class Acontroller: UIViewController {

    var ViewController:ViewController?

	// 종료 버큰 액션
    @IBAction func exitButton(_ sender: Any) {

        // A 컨트롤러의 함수를 호출하여 데이터를 넘겨준다
        ViewController?.Reply(data: "Send Acontroller Data")
        self.dismiss(animated: false, completion: nil)
    }
}
- 결과는 아래와 같다


4. Delegation
- 3번 방식의 단점을 느슨하게 해결했다, DeCoupled한 방식으로 Protocol를 채택하여 대리자를 통해 데이터를 주고받는 느낌이다
- 이렇게되면 여러 개발자가 상호의존성을 조금 덜고 프로토콜을 통하여 구현할수있기 떄문에 협업에도 용이 하다
- 바로 알아보자
- 먼저 사용할 프로토콜을 정의한다
protocol SenderProtocol {
    func dataDelivery(type: String) // 데이터를 딜리버리 하는 함수 선언
}
- A 컨트롤러에서 다음과 같이 프로토콜을 채택하고 함수의 구현부를 구현해준다 그 다음 B 컨트롤러에 present 할때 대리자 본인을 넘겨주면 된다
// A 컨트롤러
class ViewController: UIViewController, SenderProtocol {

    @IBOutlet weak var mainLabel: UILabel!

    @IBAction func nextButton(_ sender: Any) {

        let vc = self.storyboard?.instantiateViewController(withIdentifier: "Acontroller") as? Acontroller

       // 본인의 Context를 대지라로 넘겨준다
        vc?.delegate = self

        vc?.modalPresentationStyle = .fullScreen
        self.present(vc!, animated: true, completion: nil)

    }

    // 채택한 프로토콜의 구현부
    func dataDelivery(type: String) {
        mainLabel.text = type
    }
}
- 그 다음 B 컨트롤러 에서 전달받은 대리자를 이용 하여 값을 넘겨줘 보자
// B 컨트롤러
class Acontroller: UIViewController {

    @IBOutlet weak var ALabel: UILabel!

    // 전달받은 대리자
    var delegate : SenderProtocol?

	// 종료 버튼 액션
    @IBAction func exitButton(_ sender: Any) {

      	// 현재 대리자에 채택된 프로토콜에 String 데이러를 파라미터로 넣어 호출
        self.delegate?.dataDelivery(type: "Send Acontroller Data")
        self.dismiss(animated: false, completion: nil)
    }
}
- 결과는 3번과 같은 아웃풋을 가지게 된다
5. Closure
- 클로저를 잘 활용하는건 어플리케이션을 좀더 효과적으로 구현할수있는 좋은 스킬이 된다
- 무튼 여기서는 그게 중요한게 아니고 클로저를 이용해서 데이터를 주고받을수있는데 어떻게 하는지 살펴보자
class ViewController: UIViewController {

    @IBOutlet weak var mainLabel: UILabel!

    @IBAction func nextButton(_ sender: Any) {

        let vc = self.storyboard?.instantiateViewController(withIdentifier: "Acontroller") as? Acontroller

        // 이부분은 현재 B컨트롤러에있는 프로퍼티를 구현해놓은 상태이다
        // 이부분은 함수처럼 기억해놓고 B컨트롤러에서 프로퍼티를 호출하면 실행된다
        vc?.sendHandler = {
            result in
            self.mainLabel.text = result
            return "Ok result thk"
        }

        vc?.modalPresentationStyle = .fullScreen
        self.present(vc!, animated: true, completion: nil)

    }
}
- 아래는 B 컨트롤러
class Acontroller: UIViewController {

    @IBOutlet weak var ALabel: UILabel!

	// 선언된 프로퍼피 형태다 string 변수를 받고 string 반환한다는 의미
    var sendHandler: ((String) -> (String))?

    @IBAction func exitButton(_ sender: Any) {

		// 프로퍼티를 호출하면서 acontroller에있는 구현부를 실행하게된다
        print(self.sendHandler?("oh Acontroller data"))
        self.dismiss(animated: false, completion: nil)
    }

}
- 이건 '클로저"를 "활용' 한 방식이고
- 다음을 알아보자
6. NotificationCenter
- NotificationCenter는 하나의 방송국 개념
- 데이터를 송신하는 post 부분
- 데이터를 수신하는 observer 부분 구분
- 복잡한 데이터를 넘기기엔 한계가있으니 주의 (간단하고 편리한 느낌..?)
- 특이점은 연결되어있지않고 독립적인 viewController에 데이터를 전달할수있다는점
- 메커니즘은 post 하기전, observer가 미리 메모리 위에 올라가야 신호를 듣고 응답하는 느낌
class ViewController: UIViewController {

    @IBOutlet weak var mainLabel: UILabel!

    override func viewDidLoad() {
        super.viewDidLoad()
        // 드디어 이글에서 viewdid 가 등장한거같다 ㅋㅋ
        // 가장 먼저 수신자를 선언하고 등록하는건데 아래와 같이 선언하면된다
        // 중요한건 selector 부분 응답했을때 어떻게 처리할지 함수 이름을 선언하는것과
        // 이 수신기의 name 파라미터에 이름을 만들어주는것
        NotificationCenter.default.addObserver(self, selector: #selector(loadFunc), name: NSNotification.Name(rawValue: "load"), object: nil)
    }

    @IBAction func nextButton(_ sender: Any) {

        let vc = self.storyboard?.instantiateViewController(withIdentifier: "Acontroller") as? Acontroller
        vc?.modalPresentationStyle = .fullScreen
        self.present(vc!, animated: true, completion: nil)

    }

    // 수신했을때 실행되는 함수
    @objc func loadFunc(_ notification : NSNotification)
    {
    	// object 데이터를 파싱할떄
        let data = notification.object as? String ?? ""
        mainLabel.text = data

		// userinfo 데이터를 파싱할때
        let tmp = notification.userInfo!["1data"] as! String
        let tmp2 = notification.userInfo!["2dataInt"] as! Int

    }

}
- 받을 준비를 했으니 보내보자
// B 컨트롤러다..ㅎ
class Acontroller: UIViewController {

    @IBAction func exitButton(_ sender: Any) {

		// 사용법은 간단하다 post를 통해서 수신기 이름넣어주고
        // 보낼 데이터 넣어주면된다
        NotificationCenter.default.post(name: NSNotification.Name(rawValue: "load"), object: "helloe vinus")
        NotificationCenter.default.post(name: NSNotification.Name(rawValue: "load"), object: "helloe vinus", userInfo: ["1data" : "apple", "2dataInt" : 1])
        self.dismiss(animated: false, completion: nil)
    }

}
- 6가지 이동방식을 알아보았다
- 개발하면서 많이 사용한건 1번 방식이였던거같다, 복잡한 데이터를 넘기는 구조가아니였기 떄문이고 구조적으로 그럴 필요가없었기 떄문이다
- 이글을 보면 알아야할 개념이 크게 두가지 정도된다
- 프로토콜, 클로저 인데 그중에서도 클로저는 양이 좀 많고 이해할게 많으므로 이거 나름대로 쉽게 풀어보려고한다
- 혹시나 내글에 문제가있거나 잘못된 부분이있으면 댓글을 달고 알려주길 바랍니다
- 글 읽어줘서 감사합니다
'iOS > Development' 카테고리의 다른 글
| Xcode Crash Report 파일 복호화 방법 (0) | 2021.02.02 |
|---|---|
| ViewController 제거, rootView 지정 하는법 (1) | 2021.01.28 |
| iOS - SubView 제거 하는방법 (0) | 2021.01.19 |
| NSUserDefaults 사용하여 내부 DB에 간단하게 저장 (0) | 2021.01.19 |
| Alert, Action Sheet 간단 정리 (0) | 2021.01.19 |
